Tuesday 29 September 2015

Lighting P3 (c)


Key Light - It is the main light that project on the used subject.
Fill Light - The purpose of this light is to reduce the amount of shadow created by the key light.
Back Light - This is used to separate the subject background.


3 Points Lighting is commonly be used in at the movie screen.Using a 3 points lighting can create a mystery & chiaroscuro effect.In those two example,it can show that both actor are showing serious and serious effect by using 3 points lighting to isolate most of the background object.


Technical Control P3 (b)


Greater number has smaller Aperture and Smaller number has larger Aperture.

Aperture is a hole inside the lens,which control the amount of light get in through the lens.The larger size of the hole,the more light get into the lens,Therefore the photographs will be brighter.However if the hole get smaller,the picture will be dimmer than usual.

Depth of Field and the Aperture has a direct impact of the image.If the aperture is larger,The foreground and background will be isolate.Foreground will be focus and the background become blurry.However if the aperture is smaller,both foreground and background will be focus in the picture.

Shuttle Speed is the length of time a camera shuttle is open.It allows the time of light getting through the camera.The shorter time it is,the less light is reflect into the lens so it can easily freeze the high speed movement.The longer expose time allow more light reflect into the camera and the object become blurry to show to movement of object.Shuttle Speed is measure in second.It can take picture up to 30 seconds or down to 1/8000 seconds of exposed time.

ISO is the level of sensitivity of your camera to available light.Lower ISO,less sensitivity to light.Higher ISO,more sensitivity to light.While using high ISO can capture the image in a low-light environment without using flashlight.Using high ISO to capture image can cause gain or lost quality of the quality.

Task
I am ask to take photos of the Russian Dolls in AV mode of the camera.In the AV mode.I am only allow to change the size of the aperture and the amount of ISO in the camera.Using different size of aperture to show different effects of the picture.In this practise exercise,I have turned ISO into 2000 to stay constant and change the aperture manually.

 The first picture,I have used f/2.8 to take this photo.It isolated the background and objects,The object is been focus and the background is isolated.As the result,the image has a shallow depth of field and background is blurred.


 This is the second picture,compare to the first picture.This image had used aperture f/5.6 and ISO 2000,it was slightly dimmer as the aperture getting smaller and less light got into the lens.Also the background was getting clear than the first image.The depth of field got deeper.


 This is the third picture of the,I had used aperture f/11 which is getting smaller and smaller.Compare to the second picture and got slight dimmer and even less light through the lens,however the camera had change the shuttle speed for me to 1/12 which had longer expose time.Longer expose time means more light can travel through the lens to become brighter.

As the aperture getting smaller,the background become less blurry compare to first image.Also the shuttle is getting longer,to avoid the image get blurry,I have to put the camera on top of the table to avoid any shock movement while taking the image.


 This is the last image of Russian dolls.I had used aperture of f/22.It was about 8 time smaller than the first image.The background of the image is almost clear and can barely read the words behind it.As the aperture of the lens became really small,I shuttle time became really long.The longer expose time to allow more light to get into the camera to brighten the image.


Task 2) In this task,I have to take photo of a moving object under TV mode.In this mode I was only allow to change the shutter speed and the ISO.As this task was to find out how shutter speed can affect the find out come of the photograph,therefore I have turned the ISO into AUTO.

 Before taking photo of an moving object.I have took a few shot for testing.As I have set the shutter speed in to 1/50s.It was quite a long expose time under very bright environment.The result of this photograph is very bright and white as lots of sunshine get into the camera.

 1) For the first picture,The person was jumping up and down.I have set the shutter speed into 1/5s and the camera could caught the detail of the person under very long expose time.The result of this picture is very white and the person was blurred.

 2) The second picture,the shuttle speed was 2 times shorter than before.Now the cameral can slight catch the detail of the person while she was jumping around.Also the picture was slightly dimmer than before as the shuttle was shorter,less light was allow to come into the camera.

 3) It is the last image,now the shutter speed was 1/125s.It was the shortest time compare to the others.Now the camera could caught the detail of the person while she was jumping around.Also the background of the picture very detail and much dimmer compare to the second image.


Composition P3 (a)


Rules of Third & Balancing Elements : I have lined the image into 9 Different rectangles and place the tree trunk on the right.Then the background trees are less important,so I focused on the tree trunk on the right.The background is blurred to balanced the main subject and the background.


Symmetry and Patterns : The pictures I took in music department.The main entrance and the glass window has a parallel vertical symmetry.The door is been placed in the middle of the picture and the side windows are in both sides of the door.The most made eye-catching of this picture by having a "Music Department" signs on top of the door,which made everything were in parallel.


Framing : The picture is about fallen leaves.And the background were mostly surrounded by grass and tree roots.Also the picture is focus on to closer object and the further objects were blurred.It had balanced out which is the main object.


Cropping : I have cropped the image to make the image small.Tighten the image can ensure the image get the viewer's attention.

Legal / Ethical consideration p2 (g)


Laws of personality rights

The right of publicity, often called personality rights, is the right of an individual to control the commercial use of his or her name, image, likeness, or other unequivocal aspects of one's identity. It is generally considered a property right as opposed to a personal right, and as such, the validity of the right of publicity can survive the death of the individual (to varying degrees depending on the jurisdiction).

Before All the photo shooting start, I have to create a Model Release Form which allow my model to read through the detail of the working process. After they had read through all the statement in the Form, they had to fill in their personal detail in the form and sign it at the bottom.  

In the form , we expect the model realised that the whole photo shoot is a non - profit activity and only be use for educational purpose


These are the signed form from my model


Shooting Schedule P2 (f)


Time Plan : It is very important to produce a shooting schedule as I can arrange a time and give a clear information for my models to do the photo shooting. Also I have to book the studio room to ensure it area is not been occupied during my filming date.


Contingency Plan is very important as well. If issues had happened ( such as actors injury or equipments are out of order ) during my filming date. I had to re arrange a date to finish the photo shooting before the deadline. Therefor I had to ensure the studio room and actor are both free in the of my original date and the contingency date


Risk Assessment P2 (e)

Risk Assessment


Reece of Shoot location (d)


For the photo shooting of my model. I will be taking photo inside the media studio room, which to edit out the background of the image. I will have to take some photo from the outdoor environment and use photoshop to merge both photo together. The background environment must be related to the sports that the model is playing.

During taking photo in area like in the Football Field, Sports Hall , Running Track. I had to be extra careful as it is a public area in the school. Lots of people will be moving around or playing sports around it. I had to take good care to the properties of camera , lighting kit to prevent any accident happen and damage it.

The background of the Football Field and Running Track will be related to jogging exercise. The background of the Sports Hall will be related to exercise of Basketball


Equipments,props,custume p2 (c)

Props :

Basketball is need for model holding the basketball with different style.


           Dumbell is need as the for the model holding the dumbbell for training in different style.

Costume :
Basketball shoes air jordan shoes is need to be wear.

A basketball sports kits is need to wear by the model.

                                          A jogging sports kits will be wear by another model.

A jogging sports shoes will be wear by the model.


Theme for photo shoot p2 (b)

In the photoshoot,I will be doing a sports drinks advertisements.I have decided to use 3 to 4 different background to be my advertisement.I have chosen basketball court,jogging path,football field and gym room.
 This is the how the pose of a basketball player shooting hoop by jumping up high and try to shoot the hoop.
 The second one is an athlete jogging on the path and I will be using an low angle to photoshoot him.
 The third on is an football player shooting goal in the football field.I will be using high angle to do different photo shoot.
 The last one is a person doing different workout in the gym and I will be using flat angle to take the photo.
Using an shutter speed of 1/8000 sec caused the image very dim and dark.


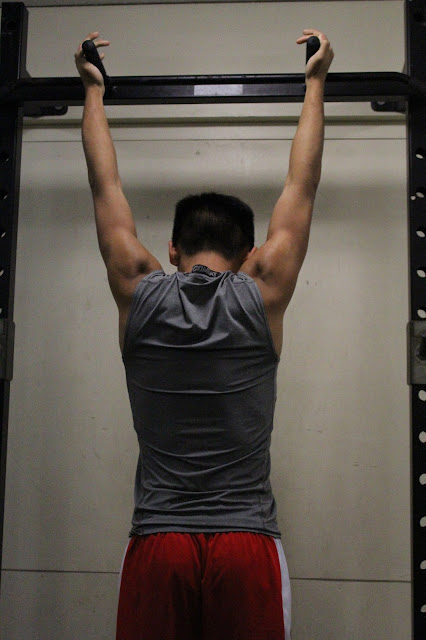
Using a shutter speed of 1/800 second,aperture value f/4.5, ISO of 6400.It caused the image slightly dimmer than standard environment.It can outline the shape of muscle better by having more shadow on the shoulder and arm area.
I had used a big aperture value which was f/4.5 and shutter speed was 1/250 s and ISO was 5000.The image was focus in the middle of the image and the other sides are blurred.

Photo above is an practise for me to record some the great spot to take this photoshoot,also it allows me to find out which lens are best to be use in different photoshoot.